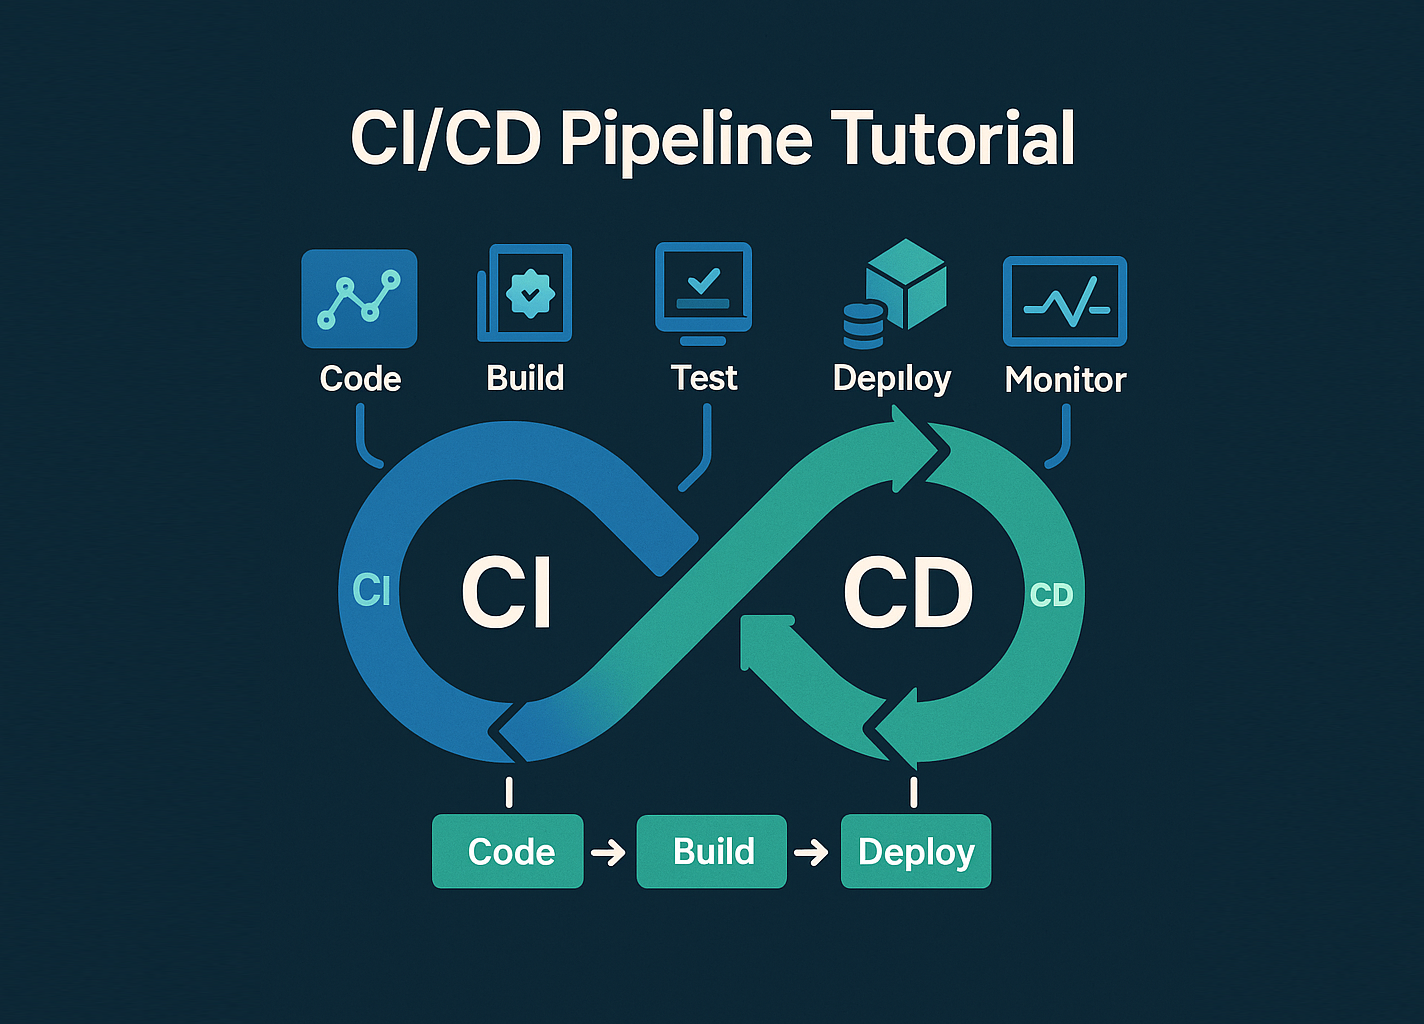
CI/CD Pipeline Tutorial for Developers
This CI/CD pipeline tutorial for developers shows how to go from “I run tests manually on my laptop” to “every push triggers automated checks and deploys safely.” Instead of staying abstract, we will build a small CI/CD pipeline around a Node.js backend, Git, and a GitHub Actions workflow (the same ideas map to GitLab CI, Azure Pipelines, CircleCI, etc.).
In this CI/CD pipeline tutorial you will:
- Understand what Continuous Integration (CI) and Continuous Delivery/Deployment (CD) actually mean
- Prepare a repo with a small Node.js API and automated tests
- Define a CI workflow that runs on every push
- Add a CD step that deploys on main branch changes
- Read basic pipeline “health” from logs and simple metrics
To see how this fits into your stack, pair it with:
Git version control tutorial,
Node.js backend basics tutorial,
PHP backend basics tutorial,
Linux basics for developers,
Kubernetes basics tutorial,
and the
Azure cloud basics tutorial.
For platform-specific details, keep docs like
GitHub Actions,
GitLab CI/CD,
or
CircleCI
open in another tab.
1. CI/CD pipeline tutorial: core concepts
Before writing YAML, this CI/CD pipeline tutorial starts with a quick mental model:
- Continuous Integration (CI) – every push triggers automated checks (lint, tests, build) so broken changes surface quickly.
- Continuous Delivery (CD) – every passing build is deployable with a button or simple command.
- Continuous Deployment – every passing change goes live automatically, often behind feature flags.
In practice, a CI/CD pipeline is just a series of automated steps wired to events in your Git repository—pushes, pull requests, tags, and scheduled runs.
2. Prepare a small backend for the pipeline
This CI/CD pipeline tutorial uses a tiny Node.js service (the same structure works for PHP, Python, Java, etc.). You can start with the app from the Node.js backend basics tutorial or create a fresh demo project.
2.1 Minimal Node.js service
mkdir ci-cd-demo
cd ci-cd-demo

npm init -y
npm install express

mkdir src
Create src/server.js:
import express from "express";

const app = express();
const port = process.env.PORT || 3000;

app.get("/health", (req, res) => {
  res.json({ status: "ok", service: "ci-cd-demo" });
});

app.listen(port, () => {
  console.log(`CI/CD demo API listening on http://localhost:${port}`);
});
2.2 Add a simple test
Now add a tiny Jest test so the CI stage has something real to run.
npm install --save-dev jest supertest
Create src/server.test.js:
import request from "supertest";
import express from "express";

function createApp() {
  const app = express();
  app.get("/health", (req, res) => {
    res.json({ status: "ok" });
  });
  return app;
}

test("GET /health returns ok", async () => {
  const app = createApp();
  const res = await request(app).get("/health");
  expect(res.status).toBe(200);
  expect(res.body.status).toBe("ok");
});
Finally, update package.json to add scripts and enable ES modules:
{
  "name": "ci-cd-demo",
  "version": "1.0.0",
  "type": "module",
  "scripts": {
    "start": "node src/server.js",
    "test": "jest"
  },
  "dependencies": {
    "express": "^4.19.0"
  },
  "devDependencies": {
    "jest": "^29.7.0",
    "supertest": "^7.0.0"
  }
}
With this in place, npm test should pass locally. That’s the baseline your CI stage will enforce.
3. Add Git and branch strategy
Because every CI/CD pipeline tutorial depends on Git, the next step is wiring your project into a remote repo and deciding on a branch strategy.
3.1 Initialize Git and push to remote
git init
git add .
git commit -m "Initial CI/CD demo service"

git remote add origin git@github.com:YOURUSER/ci-cd-demo.git
git push -u origin main
If you need a refresher on Git concepts, see the
Git version control tutorial.
3.2 Simple branch model
For this CI/CD pipeline tutorial, we will assume:
main– always deployable; CI must be green before changes merge.- Feature branches – open pull requests that must pass CI before merging into
main.
This keeps the pipeline logic straightforward while still reflecting how real teams work.
4. Define a CI workflow (GitHub Actions)
Now we create a CI workflow that runs tests on every push and pull request. The same ideas apply if you prefer GitLab CI or another engine; only the syntax changes.
4.1 Workflow file
Create .github/workflows/ci.yml in your repo:
name: CI

on:
  push:
    branches: ["main"]
  pull_request:
    branches: ["main"]

jobs:
  test:
    runs-on: ubuntu-latest

    steps:
      - name: Checkout code
        uses: actions/checkout@v4

      - name: Use Node.js 20
        uses: actions/setup-node@v4
        with:
          node-version: "20"

      - name: Install dependencies
        run: npm ci

      - name: Run tests
        run: npm test
Commit and push this file. On GitHub, you should see a CI run kick off under the “Actions” tab every time you push.
4.2 Make CI visible in pull requests
Once you have at least one successful CI run, you can enable branch protection on main so that pull requests cannot merge unless the CI workflow is green. This is one of the highest-impact uses of CI/CD for teams.
5. Add a simple CD step for deployments
Next, this CI/CD pipeline tutorial adds a basic delivery step that runs after tests pass on the main branch. The exact deployment command depends on your hosting (Docker, Kubernetes, bare VM, PaaS, etc.). Here we’ll use a placeholder deploy script to keep it generic.
5.1 Deployment script
Add a deploy.sh script at the project root:
#!/usr/bin/env bash
set -euo pipefail

echo "Starting deploy of ci-cd-demo..."

# Example steps (replace with your real ones):
# 1) Build Docker image and push to registry
# docker build -t registry.example.com/ci-cd-demo:latest .
# docker push registry.example.com/ci-cd-demo:latest
#
# 2) Trigger Kubernetes rollout
# kubectl set image deployment/ci-cd-demo \
#   api=registry.example.com/ci-cd-demo:latest
# kubectl rollout status deployment/ci-cd-demo

echo "Deploy script finished (no-op in tutorial)."
Make it executable:
chmod +x deploy.sh5.2 Extend the workflow with a deploy job
Now extend .github/workflows/ci.yml to add a deploy job that runs only on main and only after tests pass:
name: CI/CD

on:
  push:
    branches: ["main"]
  pull_request:
    branches: ["main"]

jobs:
  test:
    runs-on: ubuntu-latest
    steps:
      - name: Checkout code
        uses: actions/checkout@v4

      - name: Use Node.js 20
        uses: actions/setup-node@v4
        with:
          node-version: "20"

      - name: Install dependencies
        run: npm ci

      - name: Run tests
        run: npm test

  deploy:
    needs: test
    runs-on: ubuntu-latest
    if: github.ref == 'refs/heads/main' && github.event_name == 'push'

    steps:
      - name: Checkout code
        uses: actions/checkout@v4

      - name: Run deploy script
        run: ./deploy.sh
In a real environment you would add secrets (e.g. registry tokens, SSH keys) via the CI platform UI and reference them with ${{ secrets.NAME }} in the workflow.
6. Tiny pipeline health “chart”
Finally, to make the effect of your CI/CD pipeline more tangible, this CI/CD pipeline tutorial includes a tiny “pipeline health” chart using a simple HTML table. In a real system you’d wire this into Grafana or a dashboard, but the pattern is the same.
run_id,status,duration_sec,tests_passed
101,success,45,12
102,failed,18,8
103,success,39,12
104,success,42,12| Run ID | Status | Duration (s) | Tests Passed | Relative “Cost” |
|---|---|---|---|---|
| 101 | Success | 45 | 12 | |
| 102 | Failed | 18 | 8 | |
| 103 | Success | 39 | 12 | |
| 104 | Success | 42 | 12 |
Even in this simplistic view, you can start to reason about how long a CI/CD pipeline run takes, how often tests fail and whether you might want to split heavy jobs into parallel stages.
With this CI/CD pipeline tutorial as a baseline, you can now plug in real deployment targets (Docker, Kubernetes, Adobe Commerce, Odoo, etc.), integrate code quality tools, and connect your CI/CD pipeline to observability stacks like Prometheus, Grafana and centralized logging.