Azure Cloud Basics Tutorial for Developers
This Azure cloud basics tutorial is a hands-on introduction to Microsoft Azure for developers. Instead of just listing services, we will create a resource group, deploy a simple web app with Azure App Service, and add a storage account for files. By the end, you will understand how core Azure building blocks fit together so you can plug them into real projects.
In this Azure tutorial you will:
- Learn the core concepts: subscriptions, regions and resource groups
- Install and use the Azure CLI from your terminal
- Create a resource group for a small demo environment
- Deploy a sample web app to Azure App Service
- Add an Azure Storage account and blob container
- See how this ties into Linux, CI/CD and data platforms
For deeper reference, keep the
Microsoft Azure documentation
open. You can also connect this Azure cloud basics tutorial to your
Linux basics for developers,
CI/CD pipeline tutorial,
Java backend tutorial,
and
Kubernetes basics tutorial.
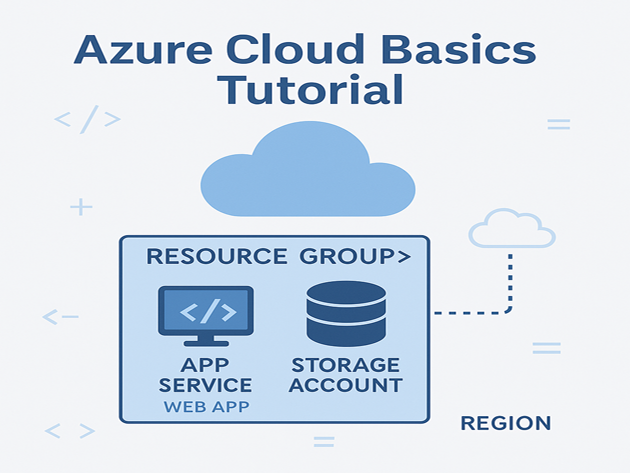
1. Azure cloud basics tutorial: core concepts
Before touching the CLI, it helps to understand how Azure organizes resources. At a high level:
- Subscription – billing and access boundary for your resources.
- Region – physical location of the datacenter (for example,
eastus). - Resource group – logical folder that holds related resources (apps, databases, storage).
In this tutorial, everything you create will live inside a single resource group so it is easy to manage and delete later.
2. Set up your Azure CLI environment
To follow the commands, you need an Azure account and the Azure CLI. If you haven’t already:
- Create a free account at the
Azure free account page. - Install the Azure CLI from the
install guide.
2.1 Log in with the Azure CLI
# log in (browser will open)
az login

# show your active subscription
az account show --output table
If you have multiple subscriptions, you can select one explicitly:
az account set --subscription "YOUR-SUBSCRIPTION-NAME"3. Create a resource group for this tutorial
A resource group lets you manage related resources as a unit. It also makes cleanup easier when you are done experimenting.
3.1 Choose a region and group name
Pick a region close to you, such as eastus, and a short name like rg-azure-basics-demo. Then create the group:
RESOURCE_GROUP="rg-azure-basics-demo"
LOCATION="eastus"

az group create \
  --name "$RESOURCE_GROUP" \
  --location "$LOCATION" \
  --output table
The output confirms that the resource group exists and lists the region. Every resource you create next will reference this group.
4. Deploy a sample web app with Azure App Service
Now you will deploy a simple web app using Azure App Service, one of the easiest ways to run HTTP-based workloads on Azure. You can deploy different stacks (Java, .NET, Node, Python); this example uses a basic Linux web app.
4.1 Create an App Service plan and web app
Start by defining a few variables:
APP_PLAN="plan-azure-basics-demo"
APP_NAME="web-azure-basics-demo-$RANDOM"

az appservice plan create \
  --name "$APP_PLAN" \
  --resource-group "$RESOURCE_GROUP" \
  --sku B1 \
  --is-linux \
  --output table
Then create a web app that runs a built-in runtime, such as Node or .NET. Here’s an example with Node:
az webapp create \
  --name "$APP_NAME" \
  --resource-group "$RESOURCE_GROUP" \
  --plan "$APP_PLAN" \
  --runtime "NODE:18-lts" \
  --output table
Azure now provisions an App Service plan (compute layer) and a web app (your application host) in the resource group.
4.2 Browse to the app
To view the default app page, run:
az webapp show \
  --name "$APP_NAME" \
  --resource-group "$RESOURCE_GROUP" \
  --query "defaultHostName" \
  --output tsv
Copy the hostname into a browser. You should see a basic “Your app is up and running” page, confirming that the deployment succeeded.
5. Add an Azure Storage account and blob container
Most real applications need to store files, logs or static assets. In this section you will create a Storage account and a blob container for uploads or static files.
5.1 Create a Storage account
STORAGE_NAME="stazurebasics$RANDOM"

az storage account create \
  --name "$STORAGE_NAME" \
  --resource-group "$RESOURCE_GROUP" \
  --location "$LOCATION" \
  --sku Standard_LRS \
  --kind StorageV2 \
  --output table
5.2 Create a blob container
Next, create a container named files and upload a sample file. First, fetch a connection string:
CONN=$(az storage account show-connection-string \
  --name "$STORAGE_NAME" \
  --resource-group "$RESOURCE_GROUP" \
  --query connectionString -o tsv)
Then create a container and upload a simple text file:
echo "Hello from Azure Storage" > sample.txt

az storage container create \
  --name files \
  --connection-string "$CONN" \
  --output table

az storage blob upload \
  --container-name files \
  --file sample.txt \
  --name sample.txt \
  --connection-string "$CONN" \
  --output table
This small workflow gives you a place to store assets that your web app can serve or process.
6. Simple Azure resource summary table
To visualize what you created in this Azure tutorial, here is a small summary table showing the main resources and their roles:
| Resource | Type | Example Name | Purpose | Relative Importance |
|---|---|---|---|---|
| Resource group | Management | rg-azure-basics-demo | Logical container for all demo resources | |
| App Service plan | Compute | plan-azure-basics-demo | Defines the compute tier for web apps | |
| Web app | App Service | web-azure-basics-demo-XXXX | Hosts your HTTP application code | |
| Storage account | Storage | stazurebasicsXXXX | Stores blobs, logs and static assets |
This kind of summary makes it easier for non-cloud specialists to understand how your architecture fits together, especially when paired with infrastructure as code and CI/CD pipelines.
7. Where to go after this Azure tutorial
This Azure cloud basics tutorial gave you a practical starting point: resource groups, App Service, Storage and the CLI. Next steps could include:
- Deploying a real Java, .NET, Node or Python backend from your
Git version control tutorial repo. - Connecting your app to a database using techniques from the
SQL basics tutorial
and
MariaDB tutorial for developers. - Containerizing services and running them on
Kubernetes
or Azure Kubernetes Service (AKS). - Automating deployments with the
CI/CD pipeline tutorial.
As you layer these pieces together, Azure becomes just another part of your toolchain—one that plays nicely with your existing Linux skills, Git workflows and data engineering stack.