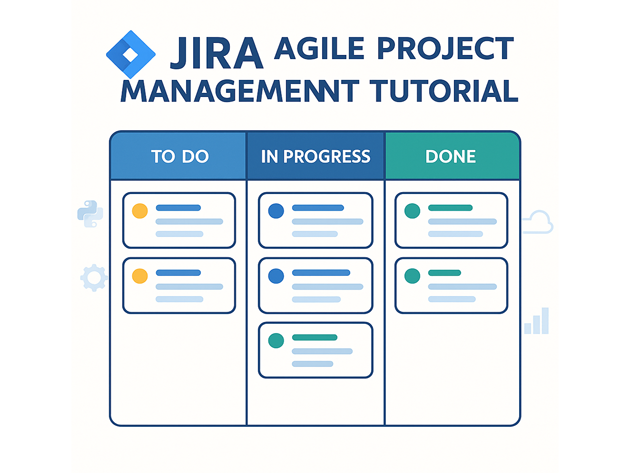
Jira Agile Project Management Tutorial
This Jira agile project management tutorial shows how to use Jira to manage a small software project from backlog to done. Instead of just listing features, we will create a project, add issues, configure a simple workflow, and track work on a board. The examples are aimed at developers and tech leads who already use tools like Git, CI/CD and cloud services.
In this Jira tutorial you will:
- Create a Jira project and choose an agile template
- Capture work as issues (epics, stories and tasks)
- Configure a simple workflow with To Do, In Progress and Done
- Use a Kanban or Scrum board to visualize work
- Write quick filters and basic JQL to slice the backlog
- Generate a lightweight status view for stakeholders
For more context around how Jira fits into your stack, see related posts like the
Git version control tutorial,
CI/CD pipeline tutorial,
Java backend tutorial,
and
Kubernetes basics tutorial.
1. Jira agile project management tutorial: core concepts
Before creating anything, it helps to understand how Jira models work. At a high level:
- Project – a container for issues, boards and workflows.
- Issue – a unit of work (epic, story, task, bug, spike).
- Workflow – the lifecycle of an issue (statuses and transitions).
- Board – a visual view (Scrum or Kanban) of issues across statuses.
This Jira agile project management tutorial uses a simple software project with stories and tasks flowing across three statuses: To Do, In Progress and Done.
2. Create a Jira project and agile board
After logging into Jira (Cloud or Server), you can create a new project from a template. For a straightforward flow:
- Click Projects → Create project.
- Choose a template such as Kanban software development or Scrum software development.
- Give it a name like Jscriptz Demo and a key such as JSD.
Jira creates a project and a default board. Columns on the board map to statuses in the workflow, which we will adjust later.
3. Add epics, stories and tasks
Now add a minimal backlog so the board has something to display. The idea is to capture work in a structure that lines up with your repo, cloud infrastructure and analytics stack.
3.1 Example issue hierarchy
Here is a small example you can recreate in Jira:
- Epic: JSD-1 – Build MVP web platform
- Story: JSD-2 – As a user, I can sign up with email and password
- Story: JSD-3 – As a user, I can see my dashboard with basic metrics
- Task: JSD-4 – Implement signup API in backend
- Task: JSD-5 – Add signup form to React front end
- Task: JSD-6 – Add basic metrics widget to dashboard
In Jira, create these using the Create button and set the appropriate issue type (Epic, Story, Task). Link tasks to stories via the Parent field so reporting stays coherent.
3.2 Quick CSV backlog import
If you have many items, you can import them via CSV. A minimal CSV for this demo might look like:
Summary,Issue Type,Parent
Build MVP web platform,Epic,
As a user, I can sign up with email and password,Story,Build MVP web platform
As a user, I can see my dashboard with basic metrics,Story,Build MVP web platform
Implement signup API in backend,Task,As a user, I can sign up with email and password
Add signup form to React front end,Task,As a user, I can sign up with email and password
Add basic metrics widget to dashboard,Task,As a user, I can see my dashboard with basic metrics
Use Jira settings → System → External System Import (or the Cloud equivalent) to map the columns and create issues automatically.
4. Configure a simple Jira workflow
This part of the Jira agile project management tutorial focuses on a very simple workflow that mirrors how you already think about tasks in Git branches or pull requests.
4.1 Basic three-step workflow
We will use three statuses:
- To Do – not started
- In Progress – currently being worked on
- Done – completed and merged/deployed
In Jira Cloud, go to Project settings → Workflows, select the workflow for your project and ensure that every issue type you care about follows this basic path. For a first pass, you can keep transitions as simple as possible: To Do → In Progress → Done, with the ability to move backward if necessary.
4.2 Map board columns to statuses
Next, open your board, click the three-dot menu and choose Board settings → Columns. Ensure that:
- To Do column → To Do status
- In Progress column → In Progress status
- Done column → Done status
Drag issues between columns to reflect reality. This tightens the feedback loop between what developers are doing in code and what stakeholders see in Jira.
5. Work on a board and track WIP
Now use the board as the “single pane of glass” for work in flight. This is where the Jira agile project management tutorial becomes real: you will move issues across the board as you code, test and deploy.
5.1 Pull work into In Progress
A typical flow for a developer looks like this:
- Pick the next highest priority story or task in To Do.
- Drag it into In Progress.
- Create a Git branch like
feature/JSD-4-signup-apireferencing the issue key. - Commit and push changes, then open a pull request linked to the Jira issue.
5.2 Move work to Done
After the pull request is reviewed and merged, and tests pass in your CI/CD pipeline, drag the issue to Done. This keeps Jira aligned with actual deployments and makes your board a trustworthy source of truth.
6. Quick filters and basic JQL
Jira Query Language (JQL) lets you slice the backlog in useful ways. You do not need advanced queries for this tutorial; a few simple ones cover most daily needs.
6.1 Example board quick filters
On the board, go to Board settings → Quick Filters and define filters like:
My issues: assignee = currentUser()
Backend work: component = Backend
Frontend work: component = Frontend
These filters let team members highlight the work that matters to them without cluttering the board.
6.2 Simple JQL examples
You can also use JQL in the issue search screen. Here are a few basics:
project = JSD AND status = "In Progress"
project = JSD AND assignee = currentUser() AND resolution = Unresolved
project = JSD AND "Epic Link" = JSD-1 ORDER BY priority DESC
These queries are enough to build simple reports or drive dashboards that combine Jira metadata with data from tools like Git, CI/CD and cloud monitoring.
7. Lightweight Jira status table
As a final touch in this Jira agile project management tutorial, here is a tiny status table that could be included in a weekly update. Imagine you run a JQL query and summarize counts per status:
status,count
To Do,8
In Progress,3
Done,5| Status | Count | Relative Workload |
|---|---|---|
| To Do | 8 | |
| In Progress | 3 | |
| Done | 5 |
This kind of summary pairs well with the rest of your engineering telemetry—from Git commit history to build pipelines and cloud metrics—giving stakeholders a simple, narrative-friendly view of progress.
That wraps up this Jira agile project management tutorial. With a small amount of configuration and disciplined use of boards, you get a reliable link between code, tasks and deployments that supports the rest of your stack.