Kubernetes Basics Tutorial: Deploy Your First App to a Cluster
This Kubernetes basics tutorial walks through deploying a simple containerized application to a Kubernetes cluster. Instead of just listing commands, we will create a Deployment, expose it via a Service, then scale it up and down so you can see how Kubernetes manages pods for you.
In this Kubernetes tutorial we will cover:
- What a Kubernetes cluster is and how it is structured
- How this Kubernetes basics tutorial models the app → container → pod → node flow
- Writing a simple Deployment manifest in YAML
- Exposing your app with a Service
- Scaling your Deployment and checking pod status
- How this fits with CI/CD, Linux, and cloud platforms
For deeper reference, keep the
official Kubernetes documentation
open in another tab. You can also connect this Kubernetes basics tutorial to your
Linux basics for developers,
CI/CD pipeline tutorial,
MariaDB tutorial for developers,
and
Java backend tutorial.
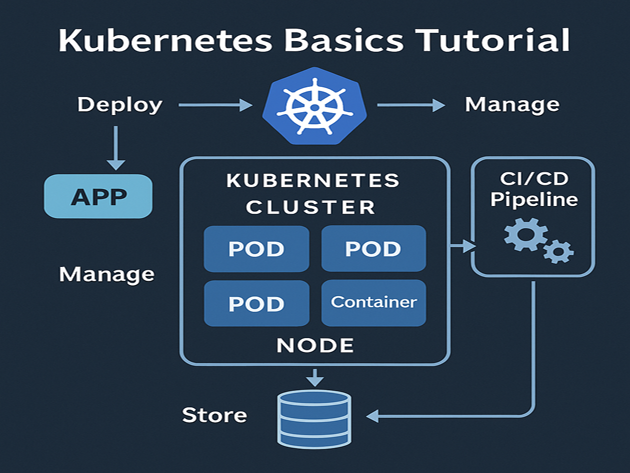
1. Kubernetes basics tutorial: cluster, nodes and pods
At a high level, a Kubernetes cluster consists of:
- Control plane – API server, scheduler and controller manager.
- Worker nodes – VMs or machines that actually run your containers.
- Pods – the smallest deployable unit; usually one container per pod in simple setups.
In this Kubernetes basics tutorial, think of your application as a container image that gets wrapped in a pod and then scheduled onto a node. Kubernetes keeps the desired number of pods running and can restart them if nodes fail.
2. Kubernetes tutorial environment: get a cluster
To follow this Kubernetes tutorial, you need access to a cluster. There are several options:
- kind (Kubernetes in Docker) for local development
- minikube for a single-node local cluster
- Managed clusters like AKS (Azure), EKS (AWS) or GKE (Google Cloud)
2.1 Check kubectl and cluster access
First, confirm that kubectl is installed and configured:
kubectl version --client
kubectl get nodes
You should see at least one node in the output. If not, follow your platform’s guide to create a cluster, then return to this Kubernetes basics tutorial.
3. Kubernetes basics tutorial: create a Deployment
In Kubernetes, a Deployment defines how many replicas of a pod you want and which container image each pod should run. In this Kubernetes tutorial, we will deploy a simple NGINX-based web app.
3.1 Write the Deployment YAML
Create a file named deployment.yaml:
apiVersion: apps/v1
kind: Deployment
metadata:
  name: kbasic-nginx
spec:
  replicas: 2
  selector:
    matchLabels:
      app: kbasic-nginx
  template:
    metadata:
      labels:
        app: kbasic-nginx
    spec:
      containers:
        - name: web
          image: nginx:1.27-alpine
          ports:
            - containerPort: 80
This manifest is central to the Kubernetes basics tutorial: it expresses the desired state (two replicas of the kbasic-nginx pod) that Kubernetes will maintain.
3.2 Apply the Deployment
kubectl apply -f deployment.yaml

kubectl get deployments
kubectl get pods -l app=kbasic-nginx
You should see two pods running. If a node fails, Kubernetes recreates pods on healthy nodes to keep the replica count satisfied.
4. Kubernetes basics tutorial: expose the app with a Service
A Deployment alone does not give you a stable IP or DNS name. In this Kubernetes tutorial, we will create a Service that load-balances traffic to the pods managed by the Deployment.
4.1 Write the Service YAML
Create service.yaml in the same directory:
apiVersion: v1
kind: Service
metadata:
  name: kbasic-nginx-svc
spec:
  selector:
    app: kbasic-nginx
  ports:
    - port: 80
      targetPort: 80
  type: ClusterIP
This Service selects pods with the label app=kbasic-nginx and forwards traffic on port 80. For local clusters like minikube, you might change type to NodePort or use minikube service to tunnel.
4.2 Apply and test the Service
kubectl apply -f service.yaml

kubectl get svc kbasic-nginx-svc
Depending on your cluster, you can curl the Service IP from within the cluster or use a node port or ingress controller. The important part for this Kubernetes basics tutorial is understanding how Services decouple clients from individual pods.
5. Kubernetes tutorial: scale the Deployment
One of the most powerful features in any Kubernetes basics tutorial is scaling. With a single command, you can change the number of pod replicas running your application.
5.1 Scale up and down
# scale up to 4 replicas
kubectl scale deployment kbasic-nginx --replicas=4

kubectl get pods -l app=kbasic-nginx

# scale back down to 1 replica
kubectl scale deployment kbasic-nginx --replicas=1

kubectl get pods -l app=kbasic-nginx
Kubernetes handles scheduling new pods, terminating old ones, and keeping the Service endpoints list up to date. You just declare the desired state; the control plane handles the rest.
6. Kubernetes basics tutorial: a simple “metrics” table
To tie this Kubernetes basics tutorial back to your analytics mindset, you can track simple cluster metrics over time—like replica counts and pod restarts—and surface them in a dashboard or HTML table inside a report.
Imagine collecting a small snapshot of deployment status:
timestamp,replicas,available_replicas,unavailable_replicas
2025-11-22T18:05:00Z,2,2,0
2025-11-22T18:10:00Z,4,4,0
2025-11-22T18:15:00Z,1,1,0
You could render that in a small table, similar to what you have done in other posts:
| Timestamp | Desired Replicas | Available | Unavailable | Relative Load |
|---|---|---|---|---|
| 2025-11-22 18:05 | 2 | 2 | 0 | |
| 2025-11-22 18:10 | 4 | 4 | 0 | |
| 2025-11-22 18:15 | 1 | 1 | 0 |
From here, you can wire Kubernetes metrics into a Prometheus + Grafana stack or into a custom
React dashboard tutorial style UI. This is where Kubernetes, Linux, CI/CD and your broader data engineering stack start to converge.
That completes this Kubernetes basics tutorial: you learned how clusters are structured, created a Deployment and Service, scaled replicas, and thought about basic metrics. In the rest of your tech carousel, you can explore how Kubernetes integrates with Java backends, CI/CD pipelines, and monitoring tools.